
Model-View-Controller (MVC) architecture is provided by the Spring Web MVC framework. There are ready components that we can use to develop flexible and loosely coupled web applications.
The MVC pattern helps us to separate the different aspects of the application, while maintaining the loose coupling between these components.

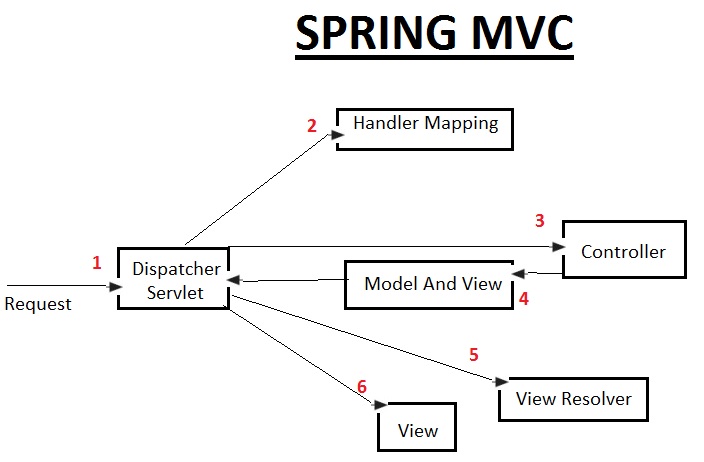
* All the incoming request is intercepted by the DispatcherServlet that works as the front controller.
* After receiving an HTTP request, DispatcherServlet consults the HandlerMapping to forward the request to the appropriate Controller.
* The controller returns an object of ModelAndView.
* The DispatcherServlet checks the entry of view resolver in the xml file and invokes the specified view component.
@Controller annotation : In Spring 3 this annotation is used to mark the class as the Spring MVC controller.
@RequestMapping annotation : It is used to map the request url. In Spring 3, it is applied on the method.
Example :

1). Create the request page index.jsp
< a href="printMessage.html" > Click here to view the message!! < /a >
2). Create the controller class PrintMessageController:
package com.test.spring.mvc;
import org.springframework.stereotype.Controller;
import org.springframework.web.bind.annotation.RequestMapping;
import org.springframework.web.servlet.ModelAndView;
@Controller
public class PrintMessageController {
@RequestMapping("/printMessage")
public ModelAndView printMessage(){
String strMessage="Hey Beautiful!";
return new ModelAndView("messagePage","message",strMessage);
}
}
@Controller annotation marks this PrintMessageController as Controller.
@Requestmapping annotation is used to map the class with the specified name. 'printMessage' in @RequestMapping should be same as href in index.jsp.
The printMessage() method will return the instance of ModelAndView controller with the mapped name, message name and message value.
3). Controller's in the web.xml file : We will be specifying the servlet class DispatcherServlet, which acts as the front controller in Spring Web MVC. All the incoming request for the html file (The href in index.jsp is printMessage.html) will be forwarded to the DispatcherServlet.
< ?xml version="1.0" encoding="UTF-8"? >
< web-app xmlns:xsi="http://www.w3.org/2001/XMLSchema-instance" xmlns="http://java.sun.com/xml/ns/javaee" xsi:schemaLocation="http://java.sun.com/xml/ns/javaee http://java.sun.com/xml/ns/javaee/web-app_3_0.xsd" id="WebApp_ID" version="3.0" >
< servlet >
< servlet-name > spring < /servlet-name >
< servlet-class > org.springframework.web.servlet.DispatcherServlet < /servlet-class >
< /servlet >
< servlet-mapping >
< servlet-name > spring < /servlet-name >
< url-pattern > *.html < /url-pattern >
< /servlet-mapping >
< /web-app >
4). Defining the bean in the xml : spring-servlet.xml should be located inside the WEB-INF directory.. In this xml file, we will specify the ViewResolver and View components. The context:component-scan element defines the base-package where DispatcherServlet will search the controller class (in our case it's com.test.spring.mvc). In this example, the InternalResourceViewResolver class is used for the ViewResolver.
The prefix+string returned by controller+suffix page will be invoked for the view component.
< ?xml version="1.0" encoding="UTF-8"? >
< beans xmlns="http://www.springframework.org/schema/beans"
xmlns:xsi="http://www.w3.org/2001/XMLSchema-instance" xmlns:p="http://www.springframework.org/schema/p"
xmlns:context="http://www.springframework.org/schema/context"
xsi:schemaLocation="http://www.springframework.org/schema/beans
http://www.springframework.org/schema/beans/spring-beans-3.0.xsd
http://www.springframework.org/schema/context
http://www.springframework.org/schema/context/spring-context-3.0.xsd" >
< context:component-scan base-package="com.test.spring.mvc" > < /context:component-scan >
< bean
class="org.springframework.web.servlet.view.InternalResourceViewResolver" >
< property name="prefix" value="/WEB-INF/jsp/" > < /property >
< property name="suffix" value=".jsp" > < /property >
< /bean >
< /beans >
5). Displaying the message in messagePage.jsp : It's a simple JSP page located inside the WEB-INF/jsp directory. It will display the message returned by the Controller (PrintMessageController).
Message is: ${message}

Spring 3 MVC Example with Request & Response
We will create a simple login application, and pass HttpServletRequest and HttpServletResponse objects in the request processing method of controller class.
1). Login page (login.jsp): This page will recieve name and password from the user.
< form action="loginRequest.html" method="post" >
Name: < input type="text" name="name" / > < br / >
Password: < input type="password" name="password" / > < br / >
< input type="submit" value="login" / >
< /form >
2). Create a Controller Class : LoginController will have a method verifyLogin(), which takes HttpServletRequest and HttpServletResponse objects. This method will check if username and password is 'admin' or not. If yes then welcomePage is displayed, else errorPage will be shown.
package com.test.spring.mvc;
import javax.servlet.http.HttpServletRequest;
import javax.servlet.http.HttpServletResponse;
import org.springframework.stereotype.Controller;
import org.springframework.web.bind.annotation.RequestMapping;
import org.springframework.web.servlet.ModelAndView;
@Controller
public class LoginController {
@RequestMapping("/loginRequest")
public ModelAndView verifyLogin(HttpServletRequest request, HttpServletResponse response) {
String username = request.getParameter("name");
String password = request.getParameter("password");
if ("admin".equals(username) && "admin".equals(password)) {
String message = "Hello, " + username;
return new ModelAndView("welcomePage", "message", message);
} else {
return new ModelAndView("errorPage", "message", "Kindly provide valid credentials.");
}
}
}
3). welcomePage and errorPage : They must be located inside the WEB-INF/jsp directory.
welcomepage.jsp :
Welcome Page
< br / >
${message}
errorpage.jsp
Error Page
< br / >
${message}
< jsp:include page="/login.jsp" > < /jsp:include >
-K Himaanshu Shuklaa..
The MVC pattern helps us to separate the different aspects of the application, while maintaining the loose coupling between these components.
- Model : It encapsulates the application data and in general they will consist of POJO.
- View : It is responsible for rendering the model data and in general it generates HTML output that the client's browser can interpret.
- Controller : It is responsible for processing user requests and building an appropriate model and passes it to the view for rendering.
* All the incoming request is intercepted by the DispatcherServlet that works as the front controller.
* After receiving an HTTP request, DispatcherServlet consults the HandlerMapping to forward the request to the appropriate Controller.
* The controller returns an object of ModelAndView.
* The DispatcherServlet checks the entry of view resolver in the xml file and invokes the specified view component.
@Controller annotation : In Spring 3 this annotation is used to mark the class as the Spring MVC controller.
@RequestMapping annotation : It is used to map the request url. In Spring 3, it is applied on the method.
Example :

1). Create the request page index.jsp
< a href="printMessage.html" > Click here to view the message!! < /a >
2). Create the controller class PrintMessageController:
package com.test.spring.mvc;
import org.springframework.stereotype.Controller;
import org.springframework.web.bind.annotation.RequestMapping;
import org.springframework.web.servlet.ModelAndView;
@Controller
public class PrintMessageController {
@RequestMapping("/printMessage")
public ModelAndView printMessage(){
String strMessage="Hey Beautiful!";
return new ModelAndView("messagePage","message",strMessage);
}
}
@Controller annotation marks this PrintMessageController as Controller.
@Requestmapping annotation is used to map the class with the specified name. 'printMessage' in @RequestMapping should be same as href in index.jsp.
The printMessage() method will return the instance of ModelAndView controller with the mapped name, message name and message value.
3). Controller's in the web.xml file : We will be specifying the servlet class DispatcherServlet, which acts as the front controller in Spring Web MVC. All the incoming request for the html file (The href in index.jsp is printMessage.html) will be forwarded to the DispatcherServlet.
< ?xml version="1.0" encoding="UTF-8"? >
< web-app xmlns:xsi="http://www.w3.org/2001/XMLSchema-instance" xmlns="http://java.sun.com/xml/ns/javaee" xsi:schemaLocation="http://java.sun.com/xml/ns/javaee http://java.sun.com/xml/ns/javaee/web-app_3_0.xsd" id="WebApp_ID" version="3.0" >
< servlet >
< servlet-name > spring < /servlet-name >
< servlet-class > org.springframework.web.servlet.DispatcherServlet < /servlet-class >
< /servlet >
< servlet-mapping >
< servlet-name > spring < /servlet-name >
< url-pattern > *.html < /url-pattern >
< /servlet-mapping >
< /web-app >
4). Defining the bean in the xml : spring-servlet.xml should be located inside the WEB-INF directory.. In this xml file, we will specify the ViewResolver and View components. The context:component-scan element defines the base-package where DispatcherServlet will search the controller class (in our case it's com.test.spring.mvc). In this example, the InternalResourceViewResolver class is used for the ViewResolver.
The prefix+string returned by controller+suffix page will be invoked for the view component.
< ?xml version="1.0" encoding="UTF-8"? >
< beans xmlns="http://www.springframework.org/schema/beans"
xmlns:xsi="http://www.w3.org/2001/XMLSchema-instance" xmlns:p="http://www.springframework.org/schema/p"
xmlns:context="http://www.springframework.org/schema/context"
xsi:schemaLocation="http://www.springframework.org/schema/beans
http://www.springframework.org/schema/beans/spring-beans-3.0.xsd
http://www.springframework.org/schema/context
http://www.springframework.org/schema/context/spring-context-3.0.xsd" >
< context:component-scan base-package="com.test.spring.mvc" > < /context:component-scan >
< bean
class="org.springframework.web.servlet.view.InternalResourceViewResolver" >
< property name="prefix" value="/WEB-INF/jsp/" > < /property >
< property name="suffix" value=".jsp" > < /property >
< /bean >
< /beans >
5). Displaying the message in messagePage.jsp : It's a simple JSP page located inside the WEB-INF/jsp directory. It will display the message returned by the Controller (PrintMessageController).
Message is: ${message}

Spring 3 MVC Example with Request & Response
We will create a simple login application, and pass HttpServletRequest and HttpServletResponse objects in the request processing method of controller class.
1). Login page (login.jsp): This page will recieve name and password from the user.
< form action="loginRequest.html" method="post" >
Name: < input type="text" name="name" / > < br / >
Password: < input type="password" name="password" / > < br / >
< input type="submit" value="login" / >
< /form >
2). Create a Controller Class : LoginController will have a method verifyLogin(), which takes HttpServletRequest and HttpServletResponse objects. This method will check if username and password is 'admin' or not. If yes then welcomePage is displayed, else errorPage will be shown.
package com.test.spring.mvc;
import javax.servlet.http.HttpServletRequest;
import javax.servlet.http.HttpServletResponse;
import org.springframework.stereotype.Controller;
import org.springframework.web.bind.annotation.RequestMapping;
import org.springframework.web.servlet.ModelAndView;
@Controller
public class LoginController {
@RequestMapping("/loginRequest")
public ModelAndView verifyLogin(HttpServletRequest request, HttpServletResponse response) {
String username = request.getParameter("name");
String password = request.getParameter("password");
if ("admin".equals(username) && "admin".equals(password)) {
String message = "Hello, " + username;
return new ModelAndView("welcomePage", "message", message);
} else {
return new ModelAndView("errorPage", "message", "Kindly provide valid credentials.");
}
}
}
3). welcomePage and errorPage : They must be located inside the WEB-INF/jsp directory.
welcomepage.jsp :
Welcome Page
< br / >
${message}
errorpage.jsp
Error Page
< br / >
${message}
< jsp:include page="/login.jsp" > < /jsp:include >
-K Himaanshu Shuklaa..
No comments:
Post a Comment